

Stuck in a rut with your coloration-mixing? Listed here are suggestions and techniques for how to shake matters up with a CMYK limited palette. Observe along with this landscape oil painting demonstration employing just three hues, as well as black and white. This demonstration is showcased in the November/December 2022 problem of Artists Magazine.
Components & Reference
Surface area: 12×16 primed panel
BRUSHES: No. 12 filbert, Nos. 1 and 4 brights, No. 1 spherical and a mop
PIGMENTS: cobalt teal, quinacridone magenta, Hansa yellow, titanium white, ivory black
OTHER: Gamsol or other solvent
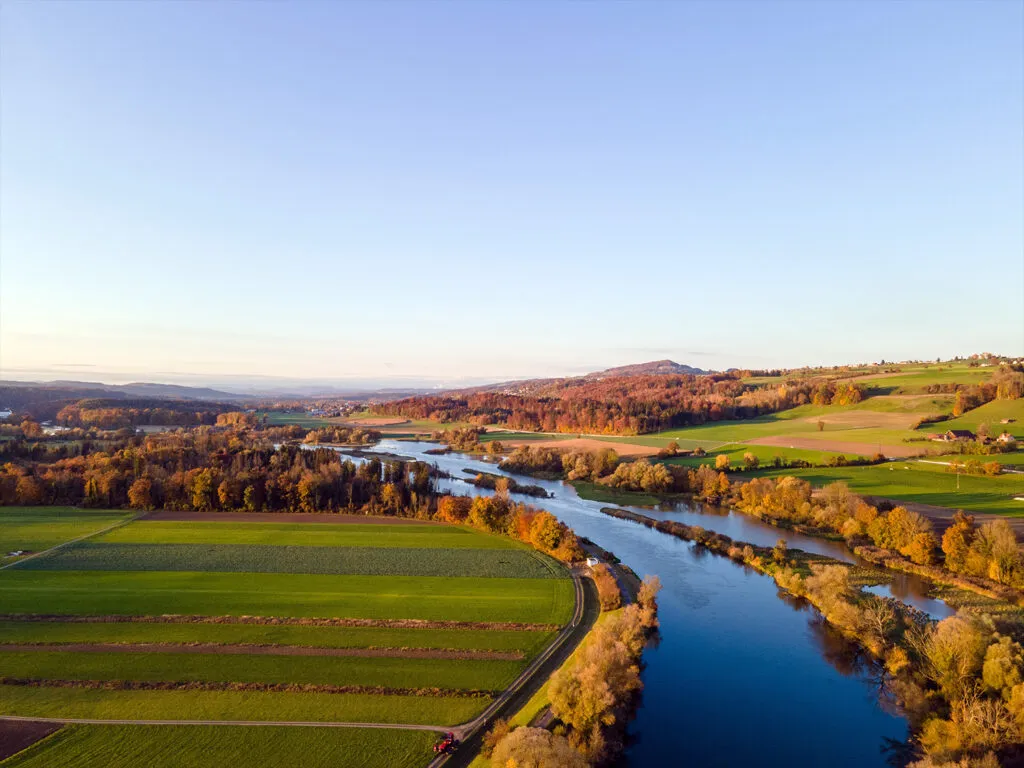
My drawing is centered on a photo by Teslariu Mihai that I discovered on Unsplash, an on the internet resource for copyright-cost-free photographs.
Oil Portray Demo
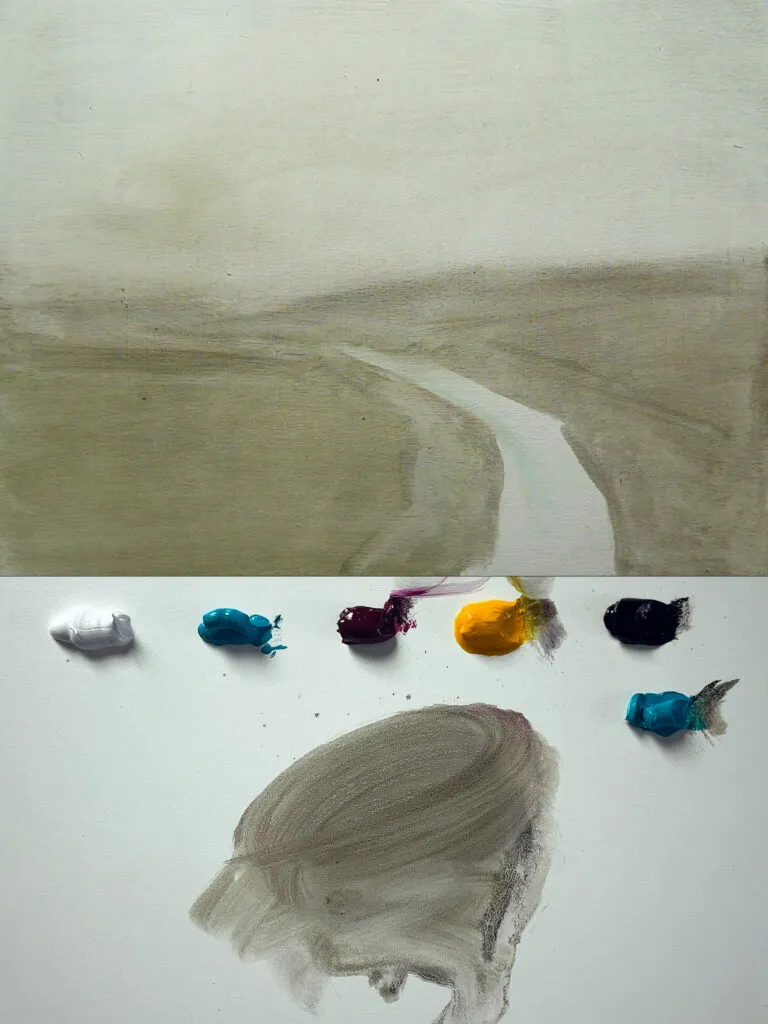
Step 1: Monochromatic Colour
Employing a No. 12 filbert or brush of very similar width, build a fast monochromatic wash of paint thinned with solvent. I utilised black combined with a compact quantity of magenta and yellow to insert warmth. The major purpose at this stage is to create a rough drawing, describing the scene in two values: a light tone for the sky and river, and darker tone for the floor.
Tip: I repeated cobalt teal on my palette to guide with shade mixing, making use of 1 to blend with magenta and the other to combine with yellow. This assists to lessen contamination when mixing secondary hues.
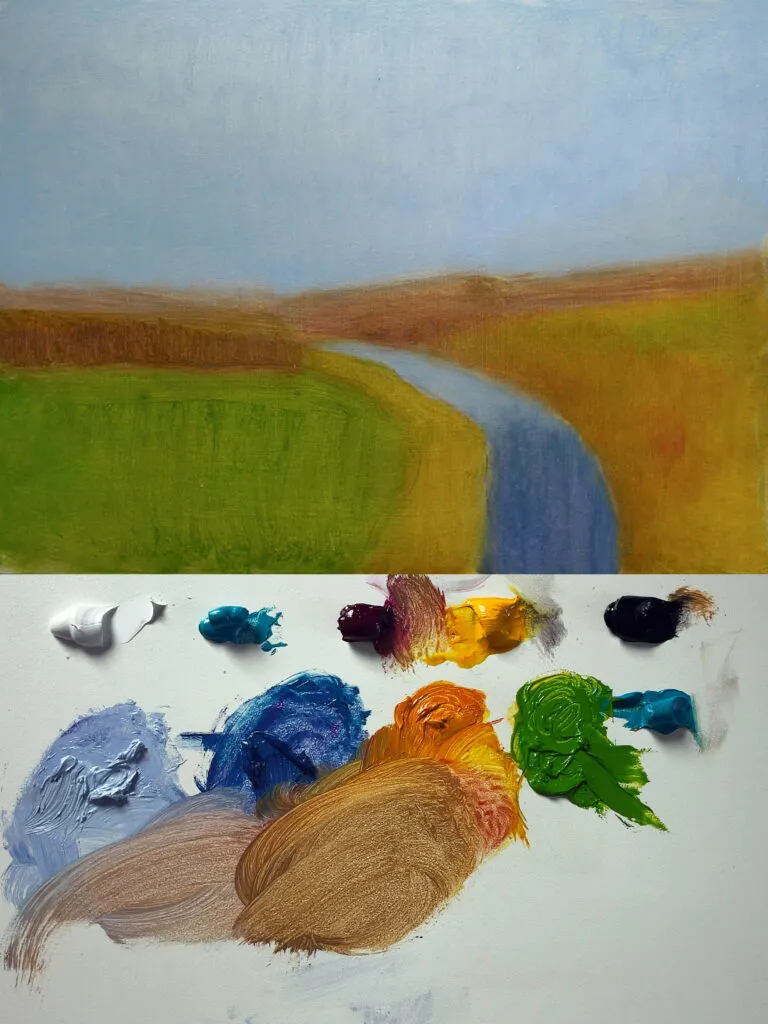
Move 2: Block-In Coloration
I blend primary secondary colours to establish a rough block-in of paint thinned with solvent or medium. I use a larger brush listed here to avoid receiving way too thorough. The objective is to create primary colour interactions amongst spots in the landscape.
I mix teal and magenta to create the blue used for the darker pieces of the drinking water reflection. That very same blue, mixed with white, is utilized for the sky. A combination of magenta and yellow are used on the land masses on the correct aspect and along the horizon. Listed here, I adjust the mixture, incorporating more yellow to the foreground areas and far more magenta to the distant trees. I add a tiny sum of the blue mixture together the horizon to soften the transition with the sky.
A blend of teal and yellow build the environmentally friendly utilized to paint the grass in the lessen still left.
Suggestion: When mixing, begin with the weaker color, gradually adding little quantities of the more robust colour till you realize the suitable mixture. In this palette, the magenta is strongest, followed by the cobalt, with yellow currently being the weakest.
Phase 3: Suitable The Drawing
I target on correcting any faults in the drawing at this phase. The most significant changes transpire in the foreground as I right the angles and curves of the river utilizing the very same shades mixed in the prior action. In the sky spot, I make bands of blue to start off refining the gradient. Alongside the horizon, I use a combination of white, magenta and a modest sum of teal. The band previously mentioned the horizon shifts a little bit as I increase much more teal to the combination. Going upward, I steadily insert teal and magenta to develop a deeper blue.
I then get the job done the eco-friendly places additional, making use of a mixture of teal and yellow with smaller quantities of magenta and black to heat and darken the shade.
Tip: Emphasis on the simple relationships in between colour in this phase. As you construct the mild and look of depth in the painting, gradually counsel some of the more compact styles.
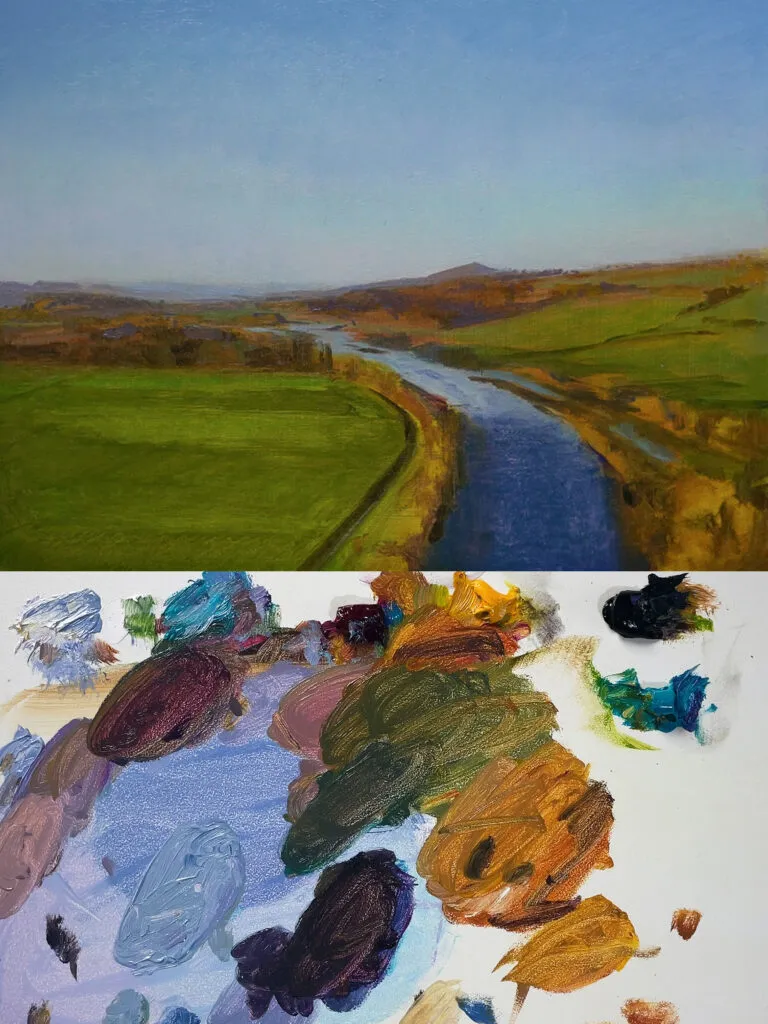
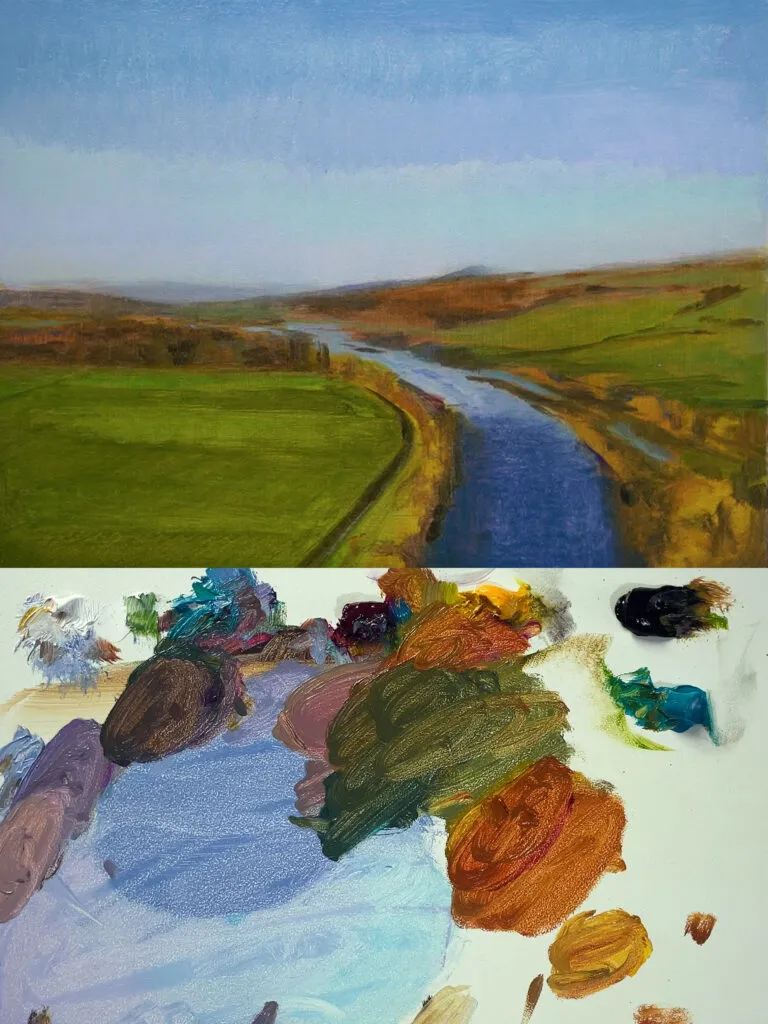
Step 4: Refine
Future, I swap to a more compact brush and refine the landscape. I start out by mixing a shadow coloration of cobalt, magenta and black. I paint the forested locations following working with a magenta/yellow mixture for the foreground trees. The distant trees use a combination of yellow, magenta and teal, reducing the quantity of yellow as the landscape recedes.
The environmentally friendly places are painted subsequent utilizing a combination of yellow and teal. I regulate the mixture with yellow, teal and little amounts of magenta to create the versions noticed in the reference. The darker shadow areas in the grass are made by adding a mixture that provides blue, magenta and black.
The reflection of the sky in the river characteristics a gradient of lighter values nearer the horizon and darker values in the foreground. The distant, mild locations use a teal, magenta and white combination. Advancing in the direction of the foreground, the color shifts from pure teal right before slowly adding magenta and black wherever the river advancements.
Suggestion: Use a mop or lover brush to mix parts of the sky and drinking water, cutting down the texture and generating distinction against any textured marks in the land and trees.
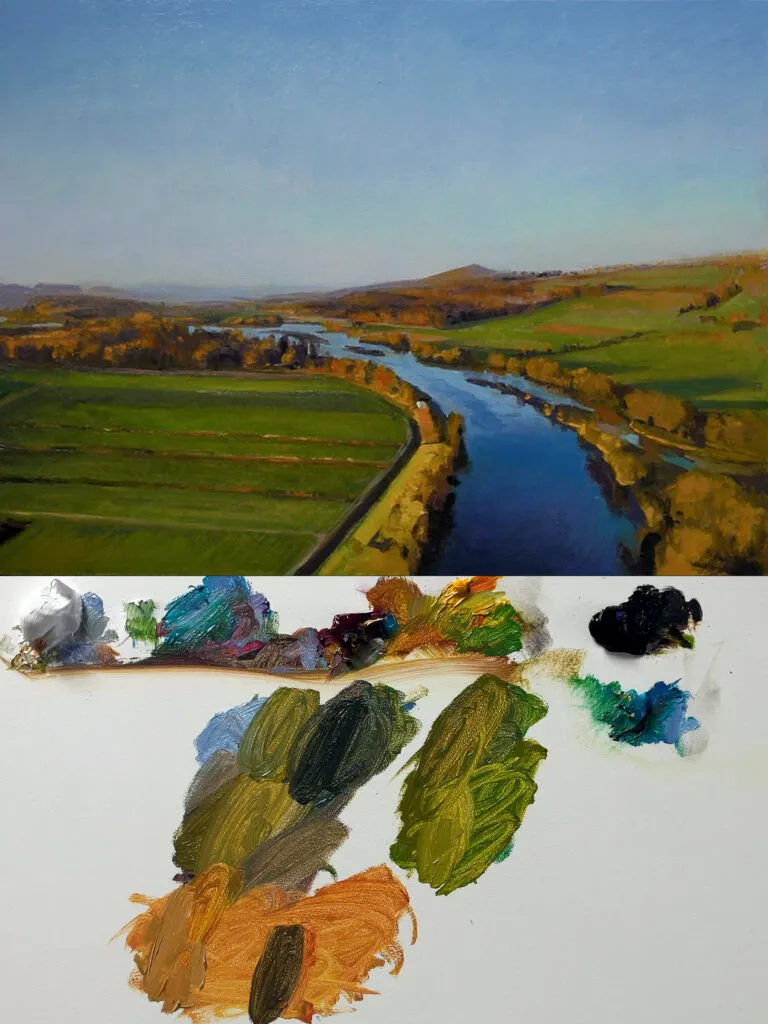
Step 5: Closing Specifics
Assess the portray from a distance to establish areas that need even more refinement. In this scenario, I chose to produce the distant elements of the river near the center of the painting. I used smaller brushes to refine the darkish spots initial, using a combination of teal, magenta and black. I then brightened some of the gentle spots in the tree utilizing a clean brush to lay on a array of orange hues ranging from practically pure yellow, to an even mixture of yellow and magenta, and approximately pure magenta.
Lastly, the grassy locations have been done employing versions of the foundation inexperienced mixture, adding magenta to include warmth and black to darken.
Idea: Check out to avoid introducing white to your brighter areas. Introducing white will lessen the saturation of your colours, so be sparing with it if you will need to lighten values.
Self-Evaluation Guidelines
The following tips will aid you to recognize what’s doing the job well in your composition, as well as regions that could use much more work.
- Step back from your do the job and examine the depth and atmosphere in the landscape. If it feels flat, really do not be scared to scrape your portray down and start out once again from Step 3.
- Reflect on the color-mixing system. When mixing two primary hues jointly, was the final result abundant and very saturated? If they became muddy, contemplate the quality of the paints becoming employed. Bigger-top quality paints will have a much larger pigment load, helping to keep saturation when blended. Lower-excellent paints can have a lot less pure pigment, diminishing the saturation when combined.
- Was it tricky to management your shades? Consider cleaning your palette periodically. If you blend coloration with a brush, make certain it’s relatively cleanse. I wipe my brushes on a rag or paper towel with a tiny total of solvent or straight linseed oil. When mixing with a palette knife, hold a paper towel helpful to wipe the knife clear concerning rounds of colour mixing.

Scott Maier is an artist, video producer and content material creator for artistsnetwork.com, exactly where he has hosted 150 episodes of the of the clearly show Drawing Together. He’s also the author of the instructional artwork e-book, See, Assume, Draw.


More Stories
Astrology & the Galactic Center
India Holds Good Promise For Animation Students
5 Tips for Effective Exaggeration